
Some of the links on this website are affiliate links, which means that I may earn a small commission at no additional cost to you if you click through and make a purchase. I only recommend products or services that I personally use and believe will add value to my readers. All opinions expressed here are my own. Thank you for supporting Easy Good Food!
If you are thousands of miles away from home—streaming Mahalaya on your laptop, scrolling through social media updates from bustling pandals, and missing the familiar hum of neighborhood celebrations—Maha Ashtami hits a little differently. No matter where you live now, with this Niramish Durga Pujo Bhog Khichuri recipe, you can recreate an effortless, steaming hot, buttery, one-pot meal anytime with just a few basic kitchen staples.
For Bengalis living outside West Bengal and across the global diaspora, recreating that authentic temple taste can sometimes feel intimidating without a traditional heavy brass handi or a sprawling stove setup. But the best part? You don’t need traditional equipment to capture the essence of home. With an induction cooktop and a compatible deep kadhai on your kitchen counter, you can bring the true spirit of Ashtami straight to your table, filling your home with the exact festive aroma you grew up loving.
Save this timeless recipe to your bookmarks and return to it year-round whenever you want to make a delectable khichuri bhog for Maa Durga.
Authentic Durga Puja Bhog Khichuri Recipe for Induction Users
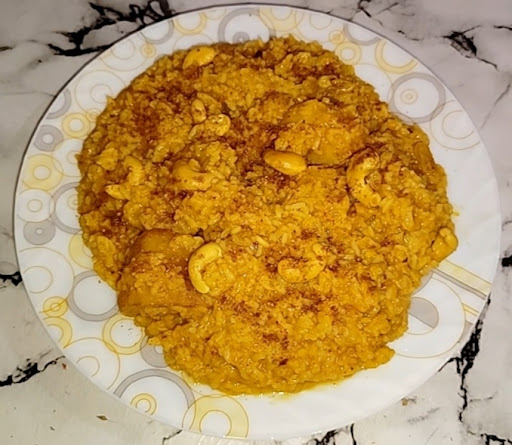

Durga Pujo Bhog Khichuri Recipe
Ingredients
Method
- Peel and cut the potatoes in equal halves.
- Chop the green chillies and ginger. Wash thoroughly and grind these together to form a smooth paste. Add water if required.
- Dry Roast Moong Dal for 5-6 minutes. If using Induction cooktop, the temperature should be 500-800W.
- Wash the Gobindobhog Rice twice and drain out the water.
- Heat oil in a pan and fry the potatoes with a bit of salt.
- Remove the excess oil and sprinkle the cumin seeds and allow splattering. Do not burn the seeds. Maintain 800W power settings if using Induction.
- When the seeds start crackling, add the ginger -chilli paste, turmeric and red chilli powder. Saute the spices at 500W for 1-2 minutes.
- As the oil separates from the spices add 4-5 cups of water. Cover the pan with a lid and raise the temperature to allow the water to boil fast.
- Add moong dal and salt when the water is boiling.
- Mix everything properly to avoid sticking at the base.Slow simmer the dal at 500W.
- When the dal is 40% cooked and swollen, add the Gobindobhog Rice. Stir the rice and dal thoroughly to avoid sticking at the base.
- Add the fried potatoes when the rice is 50% cooked. If the consistency is too dry, add a cup of hot water.
- Before removing from heat, add the homemade spice mix, garat masala, and a generous dollop of ghee.
Video
Notes
Niramish Bhog Khichuri Ingredients & Measurement – At a Glance
| Ingredient | Measurement | Role in Dish | Induction/Kadhai Cooking Tip |
| Govindobhog Rice | 1 Cup | Traditional aroma & thick texture | Wash twice & drain well before adding |
| Sona Moong Dal | 2/3 Cup | Rich flavor & creaminess | Dry-roast on medium heat until golden |
| Fried Potatoes (Aloo) | 2 Medium (Halved) | Classic bhog addition | Fry in mustard oil/ghee till golden exterior |
| Pure Cow Ghee / Mustard Oil | 1 tsp | Flavor base | Mustard oil for frying, Ghee for finish |
| Fresh Ginger & Green Chili Paste | 1 tsp | Warm spice kick | Sauté on low-medium power to avoid splatter |
| Whole Spices (Phoron) | Bay leaf, Cumin | Fragrance foundation | Bloom in mustard oil on medium power |
| Warm Water | 5 to 6 Cups | Smooth, velvety consistency | Keep boiling water ready on the side |
Durga Pujo Bhog Khichuri Recipe – Pro-Tips and Recipe Notes
Durga Pujo Bhog Khichuri is an easy recipe for beginners. It is truely a one-pot meal if you plan the steps strategically. Here are my suggestions based on the experience during the cooking process:
#1: The Water Strategy (Potato Absorption & Grain Flexibility)
Adjust your water based on whether you are using potatoes. Potatoes are heavy starch absorbers—if you add golden-fried potato chunks to your khichuri, they will soak up a noticeable amount of liquid while simmering.
- With Potatoes: Expect to use close to 6 cups of hot water in total. Start with 4 cups of boiling hot water when cooking the grains and potatoes, and keep 2 cups of boiling water on standby to splash in as the potatoes and grains expand.
- Without Potatoes: You will need less water (around 4.5 to 5 cups total) because there are no potato starches soaking up the gravy.
- Golden Rule: Always add boiling hot water when topping up your kadhai. Cold water drops the pan temperature instantly, ruining the gentle simmer and causing the grains to cook unevenly.
#2: Staggered Grain Entry (Preventing Undercooked Dal or Lumpy Rice)
Never dump the rice and moong dal into the kadhai together. Dry-roasted Sona Moong dal has a firmer grain structure that takes longer to absorb liquid and soften, whereas delicate, short-grain Govindobhog rice cooks and releases its starches rapidly.
- The Golden Sequence: Always add your roasted moong dal to the boiling spiced water first. Let it cook, soften, and swell slightly before adding the washed Govindobhog rice.
- The Result: Both grains reach absolute melt-in-the-mouth tenderness at the exact same moment—preventing hard, undercooked dal or overcooked, lumpy rice paste.
#3: Immediate & Active Base Stirring (Preventing Scorched Starches)
This is strictly NOT a “set-it-and-forget-it” dish. Whether using an induction cooktop or a gas stove, raw starches sink straight to the bottom of the deep kadhai the second they hit the hot liquid and will scorch quickly if left undisturbed.
- Immediate Action: The moment rice or dal drops into the pan, scrape along the absolute base with a flat spatula to lift the grains into the simmering water.
- The 2–3 Minute Rule: Keep stirring thoroughly from the base every 2 to 3 minutes throughout the active simmering phase. Scraping the bottom prevents burnt spots while helping release rice starches for a velvety texture.
#4: No-Lid Open Simmering (Avoiding Messy Boil-Overs)
Do not cover the kadhai with a lid while cooking the khichuri. Because both Govindobhog rice and Sona Moong dal release a high concentration of starch into the liquid, covering the pan traps expanding foam and steam, causing an immediate boil-over.
- Open-Pan Method: Cook the khichuri completely uncovered in your deep kadhai to easily monitor liquid reduction and stir without messy spills over your cooktop.
- Pressure Cooker Contrast: While sealing a pressure cooker is necessary for closed cooking, starch foam will still force yellow spice-water to spray out through the whistle. Cooking uncovered in a kadhai gives total visual and temperature control.
#5: The 1 : ⅔ Grain Ratio (Lightness & Fragrance Balance)
Ditch the standard 1:1 heavy ratio. Using equal parts rice and dal can overwhelm the natural aroma of the dish and leave you feeling overly full and sluggish after your meal.
- The Ideal Balance: Use 1 cup of Govindobhog rice to ⅔ cup of roasted Sona Moong dal.
- The Result: This ratio allows the floral, buttery perfume of the Govindobhog rice to shine through, yielding a rich, comforting bhog that stays remarkably light on the stomach.
🤫 Secret Tip Busted: The secret to that authentic, temple-style bhog flavor isn’t store-bought garam masala—it’s a freshly ground roasted spice mix! Check out my easy guide to making homemade Bengali Bhaja Moshla to elevate this khichuri and all your festive niramish dishes.
Key Ingredients Overview: The Soul of Bhoger Khichuri
What makes an authentic Niramish Durga Pujo Bhog Khichuri so unforgettable isn’t a complex list of exotic spices—it is the harmonious synergy between three core ingredients. Each plays a distinct role in creating that signature temple-style flavor, fragrance, and velvety texture.
1. Govindobhog Rice (The Fragrant Foundation)
Beyond its captivating aroma and unbeatable taste, this rice holds enormous significance in bhog and prasadam offerings across Hindu traditions. Named after its historical association as a sacred offering to Lord Govindajiu, this small, starchy short-grain rice native to Bengal unleashes a buttery, floral perfume the moment it hits hot liquid. Its high natural starch content is what gives festival khichuri its signature luscious, cohesive body as it simmers in an open kadhai.
2. Roasted Sona Moong Dal (The Protein Anchor)
Sona Moong is a premium, small-kernel yellow lentil known for its delicate taste and high nutritional value.
- Benefits in Daily Diet: Yellow moong dal is one of the most easily digestible plant-based proteins in traditional Indian cuisine. Packed with dietary fiber, potassium, and essential micronutrients, it provides light, nourishing energy without causing bloating or heaviness.
- The Roasting Secret: Dry-roasting the raw moong dal to a pale golden brown before washing reduces its raw, grassy taste and locks in a nutty, toasted flavor that defines authentic festive cooking.
3. Pure Ghee (The Essential Flavor Carrier & Nourisher)
Ghee is not an optional garnish here—it is the very heart of satvik cooking, acting as a natural flavor bridge between the toasted dal, floral rice, and warm spices.
- Ayurvedic & Modern Health Benefits: Far from being just a cooking fat, pure ghee is rich in short-chain fatty acids (like butyric acid), antioxidants, and fat-soluble vitamins (A, D, E, and K). A scientific review published in the Journal of Ayurveda and Integrative Medicine highlights how ghee supports gut health, aids nutrient absorption, and provides sustained, grounding energy.
- Culinary Role: Adding ghee during the initial phoron (tempering) and finishing with a generous spoonful right before serving seals in the volatile oils of your bhaja moshla, giving every spoon a silky, heavenly mouthfeel.
Serving Suggestions & Classic Accompaniments
To complete the authentic bhog experience, serve this easy rice cooker khichuri alongside traditional Bengali pairings:
- Begun Bhaja: Crisp, pan-fried eggplant slices seasoned with turmeric, salt, and a touch of sugar.
- Jhur-Jhure Aloo-Badam Bhaja: Crispy, thin potato shoestrings fried to perfection with crunchy peanuts and curry leaves—these addictive, golden fries add the ultimate crunch to every spoonful of khichuri! Tip: I highly recommend making this item in large batches so you can preserve some in an airtight jar and enjoy it all week long.
- Labra: A comforting, spiced mixed vegetable curry. You can add any seasonal vegetable. I have added a list of recommended vegetables below for a nutritious, authentic bengali-style curry.
- Chutney: A tangy-sweet tomato-date or raw mango chutney to balance the rich khichuri. Season it with a generous amount of homemade bhaja moshla.
- Papad & Mishti: Crunchy urad dal papad followed by your favorite traditional sweets – Rosogolla, Nolen Gurer Sondesh…
A Small Secret Tip from My Mom!
That little bit of sugar adds a wonderfully caramelized, crispy, and sweet note to this simple dish. If you have a large kadhai, try cutting the eggplants vertically into four equal pieces and deep-frying them in mustard oil for that rich, authentic taste!
Elevating Your Kitchen to the Magic of Maha Ashtami Bhog
Mastering an authentic Niramish Durga Pujo Bhog Khichuri is less about complex spices and more about honoring the delicate balance of time, temperature, and technique. By respecting the staggered cooking of roasted Sona Moong dal and Govindobhog rice, keeping an eye on your water ratios, and allowing the ingredients to gently simmer uncovered in a deep kadhai, you create far more than a simple meal—you recreate the soulful, fragrant essence of a traditional pandal bhog right on your own cooktop. Serve it piping hot with a generous swirl of pure ghee, golden vegetable fritters (bhaja), and a sweet spoonful of tomato chutney. Whether you are preparing this as a sacred offering or sharing a comforting festive lunch with loved ones, may this recipe bring warmth, joy, and the divine spirit of Durga Pujo to your home. Shubho SharadIya!
Enjoyed this post? Join our community of home cooks! Subscribe to our YouTube channel and follow our social media handles for daily Vrat-friendly tips, induction cooking hacks, and authentic Indian flavors delivered straight to your feed.